Code, notebook and live demo are available on my 🤗 HuggingFace Space
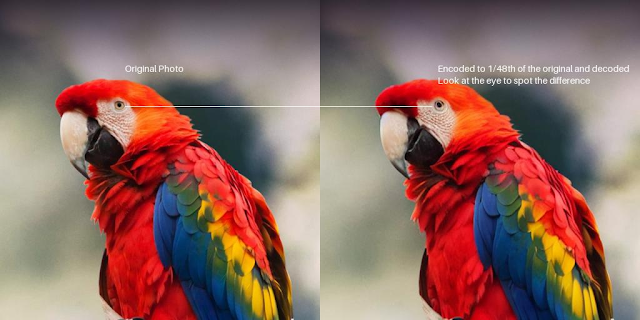
 The first step is to use an Auto-encoder to reduce the amount of data used by image. We can encode an image to a smaller Tensor, then decode it back. It does not come back exactly the same, but the difference is marginal.
Can you spot the difference?
Now that we can work on smaller Tensor, we can efficiently generate images based on a prompt. We can control how closely the model should follow the prompt by setting the guidance parameter. In the picture below, I try different value for the guidance.
Often, the model will generate an image which does not match our expectation. We can use the negative prompt to constantly remind the model to not match specific criteria throughout the generation. In the picture on the left, we asked the model to generate "a beautiful tree" which came with a lot of green. If we don't want so much green, we can set "green" in the negative prompt.
Before the image generation starts, the model generates embeddings based on the prompt given. Multiple prompts can be used, and their respective embeddings can be merged. This method can generate some interesting pictures! We can also set weights on each prompt. In the example below, we generated 10 images with different weights.
To go from the middle picture to the one on the right, the model progressively removes noise from the picture. Each step generates what is called a latent. We can capture these latents and turn them in images to show how the model progress through the image generation.
We can set the amount of noise added to the original picture. Here, we set different amount of noise (2nd row) and see the final image generated (1st row).
You can head to my HuggingFace Space to try it out!


No comments:
Post a Comment