I have been learning and exploring Machine Learning lately. As I experimented with various tutorials and Jupyter notebooks, I found that Amazon SageMaker Studio was great for productivity. Simply put, it is a cloud IDE for Machine Learning.
There are many great extensions available to enhance the developer experience. For example, the LSP extension enables code auto-completion.

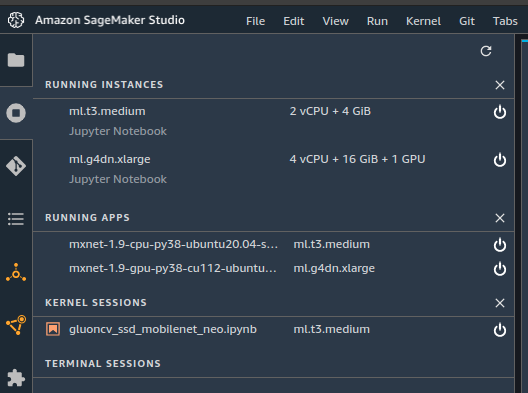
Also, I (painfully) learned that it is easy to forget a running instance. From SageMaker Studio, you can launch services such as SageMaker Training Job, Hyperparameter tuning job or Serverless Inference. With these services, you will pay only for what you use, which is great. But SageMaker Studio can run multiple instances for the various notebooks you are working on. And if you are training your model directly in the notebook, you will need a beefy instance. In my case, I was using a ml.g4dn.xlarge instance which has 4 vCPU, 16 Gb of RAM and 1 GPU. If I let it run 24/7, it will generate unnecessary costs and CO2 emissions.
To enable the developer productivity extensions and configure the server to automatically shut down all SageMaker Studio compute resources, you have to configure a Lifecycle Configuration. There are other ways to install these extensions, but they won't persist after a shutdown, so I don't recommend using them.
This repo contains some examples of scripts to be used with the Lifecycle Configuration. For this blog, we will enable the LSP Server and auto-shutdown extensions. I tweaked the examples from this repo and combined them in a single bash script.
The first step is to configure the server timeout. After 45 minutes of inactivity, I want the server to shut down.
#!/bin/bash
# This script installs the idle notebook auto-checker server extension to SageMaker Studio
# The original extension has a lab extension part where users can set the idle timeout via a Jupyter Lab widget.
# In this version the script installs the server side of the extension only. The idle timeout
# can be set via a command-line script which will be also created by this create and places into the
# user's home folder
#
# Installing the server side extension does not require Internet connection (as all the dependencies are stored in the
# install tarball) and can be done via VPCOnly mode.

set -eux

# timeout in minutes
export TIMEOUT_IN_MINS=45
# Should already be running in user home directory, but just to check:
cd /home/sagemaker-user

# By working in a directory starting with ".", we won't clutter up users' Jupyter file tree views
mkdir -p .auto-shutdown

# Create the command-line script for setting the idle timeout
cat > .auto-shutdown/set-time-interval.sh << EOF
#!/opt/conda/bin/python
import json
import requests
TIMEOUT=${TIMEOUT_IN_MINS}
session = requests.Session()
# Getting the xsrf token first from Jupyter Server
response = session.get("http://localhost:8888/jupyter/default/tree")
# calls the idle_checker extension's interface to set the timeout value
response = session.post("http://localhost:8888/jupyter/default/sagemaker-studio-autoshutdown/idle_checker",
            json={"idle_time": TIMEOUT, "keep_terminals": False},
            params={"_xsrf": response.headers['Set-Cookie'].split(";")[0].split("=")[1]})
if response.status_code == 200:
    print("Succeeded, idle timeout set to {} minutes".format(TIMEOUT))
else:
    print("Error!")
    print(response.status_code)
EOF
chmod +x .auto-shutdown/set-time-interval.sh

# "wget" is not part of the base Jupyter Server image, you need to install it first if needed to download the tarball
sudo yum install -y wget
# You can download the tarball from GitHub or alternatively, if you're using VPCOnly mode, you can host on S3
wget -O .auto-shutdown/extension.tar.gz https://github.com/aws-samples/sagemaker-studio-auto-shutdown-extension/raw/main/sagemaker_studio_autoshutdown-0.1.5.tar.gz

# Or instead, could serve the tarball from an S3 bucket in which case "wget" would not be needed:
# aws s3 --endpoint-url [S3 Interface Endpoint] cp s3://[tarball location] .auto-shutdown/extension.tar.gz

# Installs the extension
cd .auto-shutdown
tar xzf extension.tar.gz
cd sagemaker_studio_autoshutdown-0.1.5

# Activate studio environment just for installing extension
export AWS_SAGEMAKER_JUPYTERSERVER_IMAGE="${AWS_SAGEMAKER_JUPYTERSERVER_IMAGE:-'jupyter-server'}"
if [ "$AWS_SAGEMAKER_JUPYTERSERVER_IMAGE" = "jupyter-server-3" ] ; then
    eval "$(conda shell.bash hook)"
    conda activate studio
fi;

pip install --no-dependencies --no-build-isolation -e .
jupyter serverextension enable --py sagemaker_studio_autoshutdown
# Install:
# - The core JupyterLab LSP integration and whatever language servers you need (omitting autopep8
#   and yapf code formatters for Python, which don't yet have integrations per
#   https://github.com/jupyter-lsp/jupyterlab-lsp/issues/632)
# - Additional LSP plugins for formatting (black, isort) and refactoring (rope)
# - Spellchecker for markdown cells
# - Code formatting extension to bridge the LSP gap, and supported formatters
echo "Installing jupyterlab-lsp and language tools"
pip install jupyterlab-lsp \
    'python-lsp-server[flake8,mccabe,pycodestyle,pydocstyle,pyflakes,pylint,rope]' \
    jupyterlab-spellchecker \
    jupyterlab-code-formatter black isort
# Some LSP language servers install via JS, not Python. For full list of language servers see:
# https://jupyterlab-lsp.readthedocs.io/en/latest/Language%20Servers.html
jlpm add --dev bash-language-server dockerfile-language-server-nodejs

# This configuration override is optional, to make LSP "extra-helpful" by default:
CMP_CONFIG_DIR=.jupyter/lab/user-settings/@krassowski/jupyterlab-lsp/
CMP_CONFIG_FILE=completion.jupyterlab-settings
CMP_CONFIG_PATH="$CMP_CONFIG_DIR/$CMP_CONFIG_FILE"
if test -f $CMP_CONFIG_PATH; then
    echo "jupyterlab-lsp config file already exists: Skipping default config setup"
else
    echo "Setting continuous hinting to enabled by default"
    mkdir -p $CMP_CONFIG_DIR
    echo '{ "continuousHinting": true }' > $CMP_CONFIG_PATH
fi
if [ "$AWS_SAGEMAKER_JUPYTERSERVER_IMAGE" = "jupyter-server-3" ] ; then
    conda deactivate
fi;

# Restarts the jupyter server
nohup supervisorctl -c /etc/supervisor/conf.d/supervisord.conf restart jupyterlabserver

# Waiting for 30 seconds to make sure the Jupyter Server is up and running
sleep 30

# Calling the script to set the idle-timeout and active the extension
/home/sagemaker-user/.auto-shutdown/set-time-interval.sh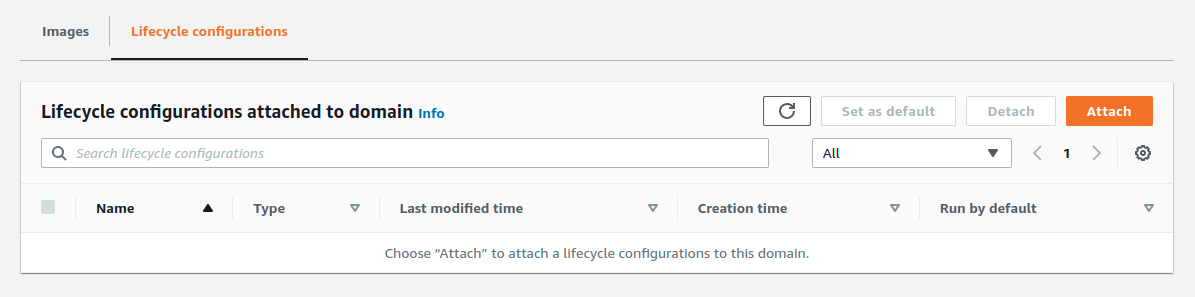


No comments:
Post a Comment